
Paid SSL certificate: how to order, validate and install it
PrintTo get a paid SSL certificate from TopHost, you order it in the client area, send a CSR, prove that you control the domain, wait for the certificate authority to issue it and then install the files on your site. This guide covers every stage. If you only need basic HTTPS for a site on our shared hosting, you may not need to buy anything: a free certificate is issued automatically, as explained in automatic SSL issuance.
Which certificate to choose
TopHost sells certificates from Sectigo, DigiCert, GeoTrust, RapidSSL, Thawte and GoGetSSL. They differ mainly in two ways.
- Validation level. DV (domain validation) only checks that you control the domain and is usually issued within minutes. OV (organization validation) and EV (extended validation) also check the company behind the site, so the authority asks for company details and may call you; this can take several working days.
- What it covers. A single-domain certificate protects one name (most also include the www version). A multi-domain (SAN) certificate protects several different names. A wildcard certificate, ordered as
*.example.com, protects all first-level subdomains such asshop.example.comormail.example.com, but nota.b.example.com.
If you want certificates that your own server renews by itself, look at Sectigo ACME Certificate-as-a-Service instead.
Before you order
- Decide where the certificate will be installed (cPanel hosting, a VPS with Nginx or Apache, Windows IIS) and whether you will create the CSR yourself or let the client area generate it.
- To create the CSR in cPanel: open SSL/TLS in the Security section, then Certificate Signing Requests (CSR), fill in the domain and company fields and click Generate. cPanel keeps the matching private key in your account, so you will not need to paste it later.
- Make sure you can complete one of the validation methods described below: receive mail at an address such as admin@ your domain, edit the DNS zone, or upload a file to the site.
Step 1. Place the order
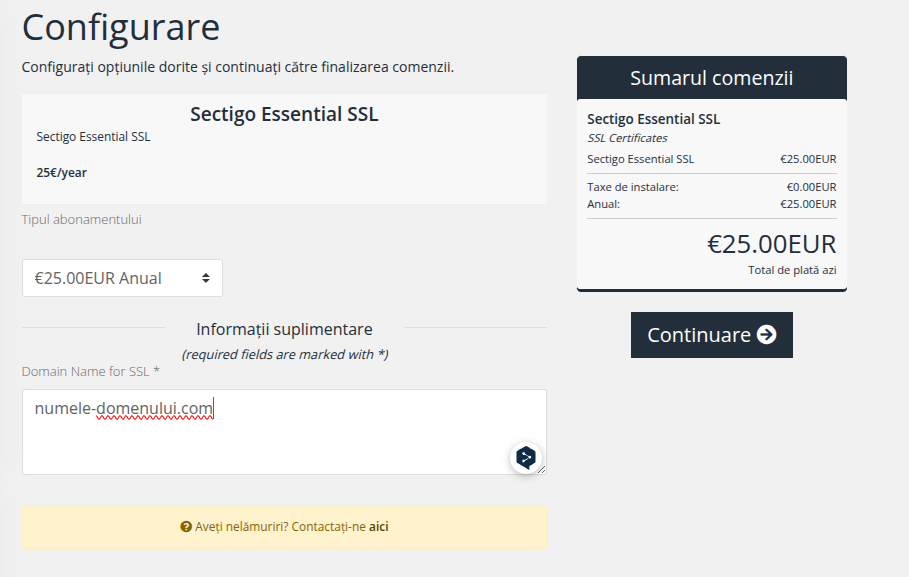
- Choose the certificate you need and the billing period.
- In Domain Name for SSL, type the domain exactly as it should appear in the certificate, for example
example.com. For a wildcard, type*.example.com. - Check the order summary, click Continue and pay the invoice.
Step 2. Open the certificate for configuration
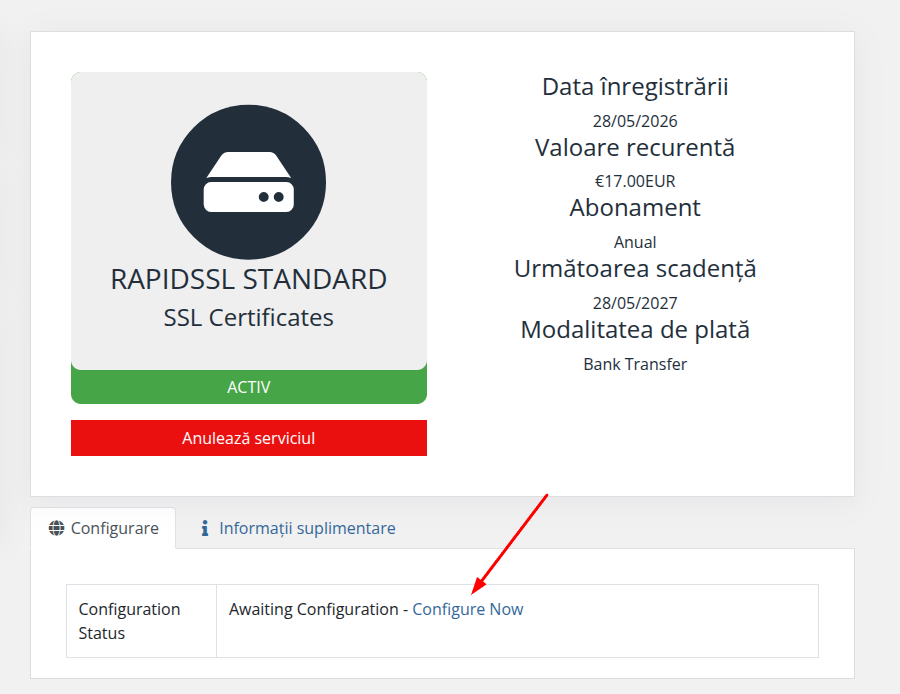
Once the invoice is paid, open My Services and select the SSL certificate. Its status is shown as Awaiting Configuration.

Click Configure Now (on some pages the button is called Manage) to start the setup form.
Step 3. Provide the CSR
The CSR, short for Certificate Signing Request, is a block of text created on the server where the certificate will live. It carries the domain name and the public key; the private key that belongs to it stays on that server.
- If you already have a CSR, paste the whole block, including the
-----BEGIN CERTIFICATE REQUEST-----and-----END CERTIFICATE REQUEST-----lines. - If you do not have one, click Generate CSR. In that case the private key is created by the system and you will download it later with Get Private Key. Save it somewhere safe: without it the certificate cannot be installed.
- Choose New Order for a first certificate or Renew if you are extending one you already had.
Check the domain in the CSR carefully. After issue it cannot be changed; a mistake means a reissue.
Step 4. Fill in the contact details
Enter the administrative contact: first and last name, organization, e-mail, address, city, postal code, country and phone. For DV certificates these details are used only to contact you and do not appear in the certificate. For OV and EV certificates the company details must be accurate, because the authority checks them.
Step 5. Confirm that you control the domain (DCV)
The certificate authority will not issue anything until domain control validation succeeds. Pick one method:
- E-mail. An approval message goes to one of the standard addresses of the domain: admin@, administrator@, hostmaster@, postmaster@ or webmaster@. The mailbox must exist; if it does not, create it in cPanel first, then open the message and approve.
- DNS. The configuration page shows a record (CNAME or TXT, depending on the authority) with a name and a value. If your domain uses TopHost DNS, add it in cPanel under Zone Editor; the steps are the same as in adding a TXT record. Copy both fields exactly, without extra spaces or quotes.
- HTTP file. You download a small text file and upload it to
/.well-known/pki-validation/in the site's document root, so that it opens in a browser over plain HTTP.
After adding a DNS record or a file, wait a little (a DNS record is usually visible within minutes, sometimes longer) and click Revalidate or Verify on the certificate page.
Step 6. Wait for the certificate and download it
The status changes from Processing to Active. For DV this usually takes minutes to a few hours; OV and EV take longer because of the company checks. Then the certificate page offers:
- Download Certificate: the certificate for your domain (.crt);
- Download Intermediate/Chain: the intermediate certificates (CA bundle);
- Download PEM: certificate and chain in one file, handy for Nginx and similar servers;
- Get Private Key: only if the CSR was generated in the client area.
Step 7. Install the certificate
On TopHost cPanel hosting
- In cPanel, open SSL/TLS, then Manage SSL sites.
- Select the domain.
- Paste the certificate into Certificate (CRT). If the CSR was made in cPanel, the private key fills in by itself (you can also use Autofill by Certificate); otherwise paste the key into Private Key (KEY).
- Paste the intermediate certificates into Certificate Authority Bundle (CABUNDLE).
- Click Install Certificate, then open the site with
https://and check the padlock.
On a VPS or another server
Nginx needs the certificate followed by the chain (the PEM file) in ssl_certificate and the private key in ssl_certificate_key. Apache takes the certificate in SSLCertificateFile and the key in SSLCertificateKeyFile; on older Apache versions the chain goes into SSLCertificateChainFile. On Windows IIS, import the certificate with its key as a .pfx file and select it in the site's HTTPS binding.
Renewal and reissue
Under the rules that all certificate authorities follow, the maximum lifetime of a single certificate is shrinking step by step (200 days since March 2026). A subscription can therefore last longer than one certificate: before the current certificate expires, reissue it from the same service page with a new CSR and install the new files. To avoid doing this by hand, choose an ACME subscription, where your server renews certificates automatically.
Common problems
- The validation e-mail never arrives. Check that the chosen address exists and is not full, look in the spam folder, or switch to DNS validation.
- DNS validation fails. The record is probably in the wrong zone (the domain uses nameservers other than TopHost's, so the record must be added where the DNS really is) or the name ended up doubled, as in
_abc.example.com.example.com. Some DNS editors add the domain by themselves; there, type only the first part of the name. - The browser says the certificate is not trusted. The intermediate certificates are missing. Install the CA bundle or use the PEM file.
- The private key is lost. The certificate cannot be used without it. Create a new CSR and reissue the certificate.
Need help?
If validation stays pending or the installation shows an error, open a ticket with the domain name and the exact message you see. Do not send the private key in the ticket.
