
How to install WordPress in cPanel: WP Toolkit or Softaculous
PrintHow you get WordPress depends on your plan. On WordPress Hosting and Business Hosting WordPress is installed for you when the account is created, and you manage it in WP Toolkit; there you can also add more WordPress sites. On Web Hosting SSD plans you install it yourself with Softaculous Apps Installer. Both ways take a few minutes and create the database automatically.
Not sure which plan you have? Look at the service name in the client area, under Services.
WordPress Hosting and Business Hosting: WP Toolkit
Open the site that is already installed
- Sign in to cPanel (from the client area: Services, your hosting service, then the cPanel login button).
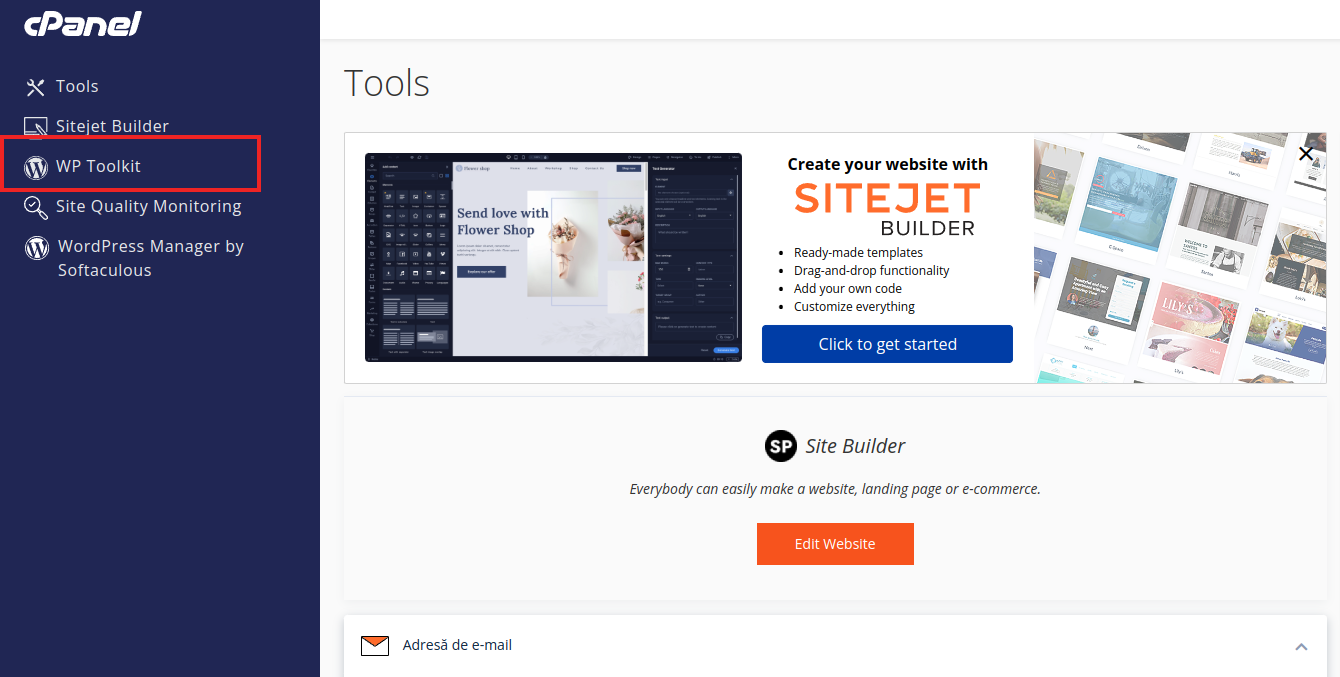
- Click WP Toolkit in the left menu of cPanel. You can also search for it in the cPanel search box.
- Your site appears as a card in the list. Click Log In on the card to enter the WordPress dashboard without typing a password. From the same card you can change the administrator password, turn on automatic updates and see the security status.
Add another WordPress site
- Make sure the new domain or subdomain is already on the account (see How to add a domain to cPanel).
- In WP Toolkit click Install.

- In the form choose the domain and, only if you want the site in a folder, a directory name. Then set the site title, the language, the administrator username, password and e-mail. The WordPress version, the database name and the update settings can stay as suggested.
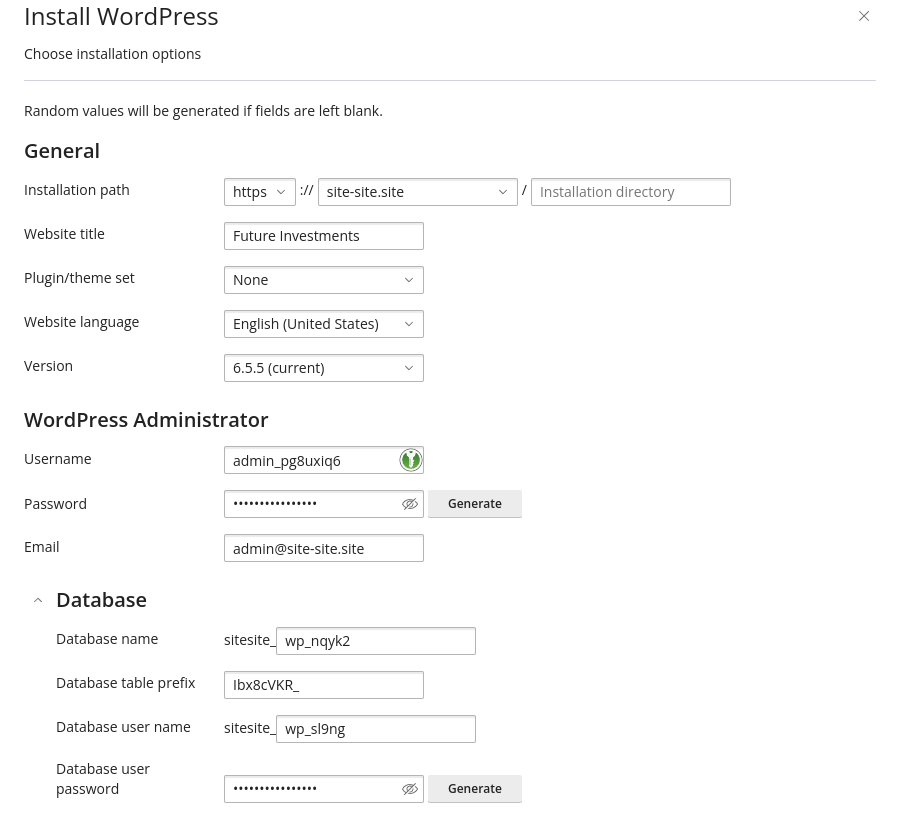
- Click Install. After a minute the new site shows up in the WP Toolkit list.
Everything else WP Toolkit can do (cloning, staging copies, plugin management, security hardening) is described in Complete guide to WP Toolkit in cPanel.
Web Hosting SSD: Softaculous Apps Installer
- In cPanel find the Software section and open Softaculous Apps Installer.
- Click WordPress (it is usually first on the Softaculous home page, otherwise in the Blogs category), then Install Now.
- Fill in the form:
- Choose Protocol:
https://once the free certificate has been issued (see Automatic issuance of SSL). - Choose Domain: the domain of the site.
- In Directory: leave empty so the site opens directly on the domain. Softaculous often suggests a folder such as
wp; delete it unless you wantexample.md/wp. - Site Name, Site Description: can be changed later in WordPress.
- Admin Username, Admin Password, Admin Email: a username other than "admin", a long unique password and an address you read.
- Select Language: the language of the dashboard and of the site.
- Choose Protocol:
- Click Install and wait until the final screen shows the site link and the administrator link.
The WordPress dashboard is at https://example.md/wp-admin (your domain in place of example.md).
If WP Toolkit is also present in your cPanel, a WordPress installed with Softaculous or uploaded by hand can be managed there too: open WP Toolkit and click Scan. The sites found are added to the list.
Right after installation
- Permalinks. In WordPress open Settings, then Permalinks, choose "Post name" and save. Your pages get readable addresses and the
.htaccessfile is written correctly. - Cache. On WordPress Hosting and Business Hosting the server runs LiteSpeed, so the LiteSpeed Cache plugin is the right choice: see Turning on LiteSpeed Cache for WordPress.
- Updates. Update WordPress, plugins and themes from WP Toolkit in cPanel where possible, with a backup first; the WordPress dashboard is the alternative. The safe order is in A safe routine for WordPress, plugin and theme updates.
- Security. Remove the plugins and themes you do not use and follow Protecting and analyzing WordPress website security.
- A shop? Add WooCommerce as shown in Setting up an online store with WooCommerce.
Common problems
- The domain still shows an old page. A leftover
index.htmlin the site folder is opened before WordPress'sindex.php. Rename or delete it in File Manager. Also check that WordPress did not go into a subfolder. - The domain does not open. It may not point to TopHost yet; DNS changes usually show within a few hours and at most 24 to 48. Meanwhile use How to access the site while it is being delegated.
- Login loops, a critical error or 404 on inner pages. See Common WordPress problems and how to fix them.
If the installation fails, open a ticket with the domain and the message you see.
